Deploying Sitecore with Terraform part 2

This is the second part of my article about deploying Sitecore through Terraform. The first part can be found here and discusses Terraform features and explains why Terraform is a good fit for deploying Sitecore.

This article will walk through my sample Github solution which deploys a Sitecore site in Azure through Terraform. Below graph generated by Terraform’s Graph command shows the components which will be created.

Clone Github Repo

This article uses the code from the Github repo which can be found here. This repo contains a variables.tf file. The first section of this file needs to be populated with settings specific to each deployment. In this article these values will be set in a file called secret.tfvars which is excluded form Github. The variables can be set like below:

StorageKey = "your value"
LicenseFile = "your value"
BacpacCoreDB = "your value"
BacpacMasterDB = "your value"
BacpacWebDB = "your value"
VCppPackage = "your value"
SitecoreZip = "your value"
DomainNameLabel = "your value"
xDbDisableFile = "your value"

The last setting is xDbDisableFile. This patch file disabled xDB as this repo stands up a Sitecore XM topology without xDB. Folllowing is in this file, but it can also be used to patch in other settings.

<configuration xmlns:patch="http://www.sitecore.net/xmlconfig/" xmlns:set="http://www.sitecore.net/xmlconfig/set/" xmlns:role="http://www.sitecore.net/xmlconfig/role/">
  <sitecore>
    <settings>      
      <setting name="Xdb.Enabled">
        <patch:attribute name="value" value="false" />
      </setting>
      <setting name="Xdb.Tracking.Enabled">
        <patch:attribute name="value" value="false" />
      </setting>
    </settings>
  </sitecore>
</configuration>

After the initial setup this article will follow the standard 4-step Terraform workflow which can be seen below.

Terraform Init

After getting the repo Terraform needs to initialize the working directory and download the Azure Resource Manager provider. Running terraform init will take care of this:

Terraform Plan

The plan command can be run now that the workspace is initialized. This will show all the resources which will be created, in this case 11 resources will be created:

  1. Network Interface
  2. Public IP
  3. Resource Group
  4. Sitecore Core Database
  5. Sitecore Master Database
  6. Sitecore Web Database
  7. Firewall rule for SQL traffic
  8. Azure SQL DB server
  9. Subnet
  10. Virtual Machine
  11. Virtual Network

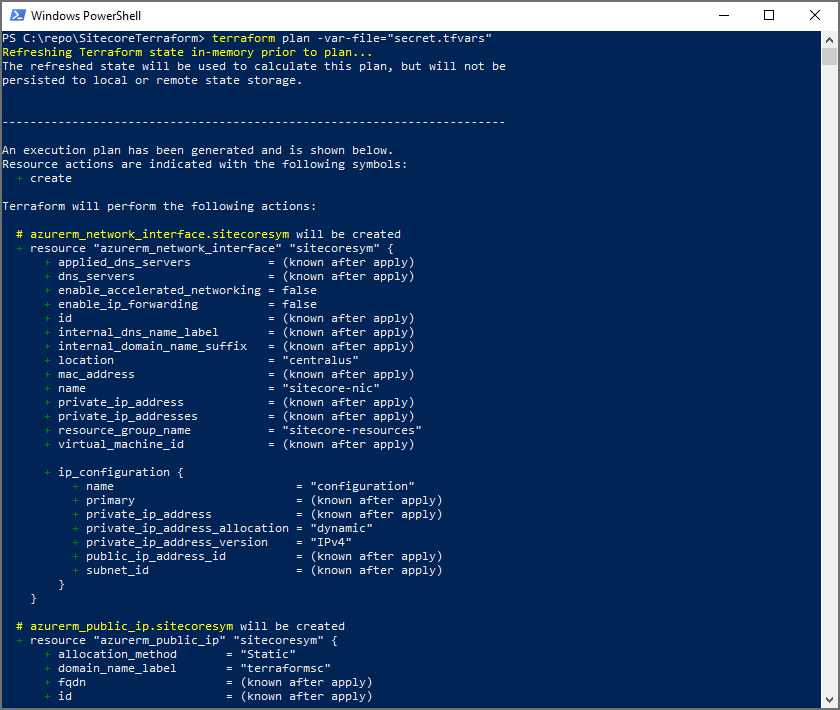
As mentioned before the values of some of the variables are specified in secret.tfvars, this will be passed into the plan command terraform plan -var-file=”secret.tfvars”. Below is the start of the output from this command:

Terraform Apply

The apply command can be run now after the output from the plan command is reviewed. This will create the 11 resources from the plan command which make up the Sitecore site.

Inside the files folder in the repo is a winrm.ps1 script. This will be put on the virtual machine which is created by Terraform and will setup Sitecore. This file uses some variables which are passed in by the main.tf file here

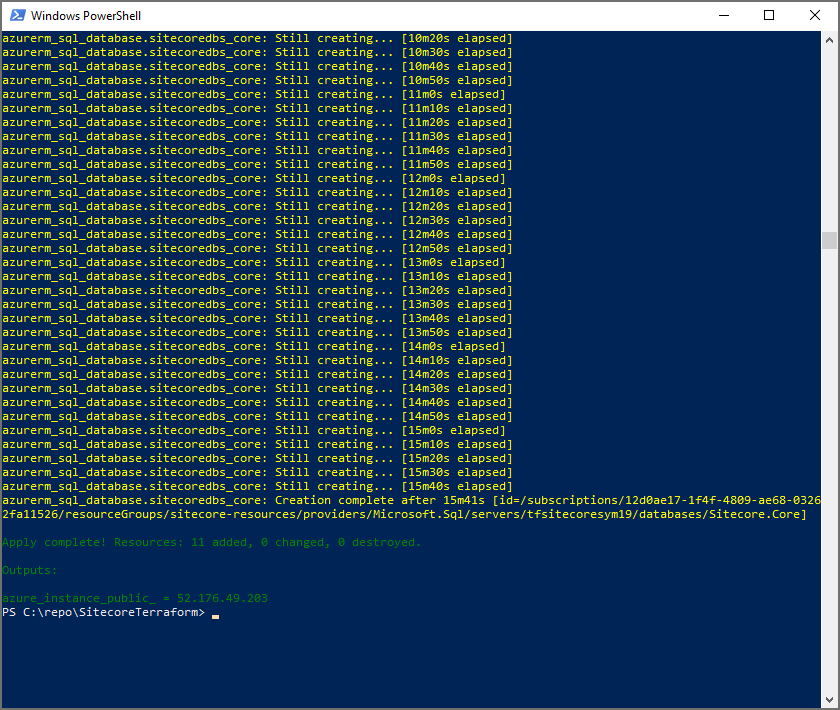
The apply command will also need the Terraform variables files so the full apply command will look like this: terraform apply -var-file=”secret.tfvars”, this will create the resources and returns a success message after this is done:

The Sitecore site can be opened when this is done and when the winrm.ps1 powershell script is complete. By default it will be publicly accessible at <domain-name-label>.<azure-region>.cloudapp.azure.com, see below for the example with this setup:

Terraform Destroy

When done all resources can be torn down again by running terraform destroy. This is obviously an optional step, however it is important to continue to make any changes to resources through Terraform to ensure the code stays up to date and the deployment process is repeatable, predictable and automated.

Advertisement

Deploying Sitecore with Terraform Part 1

During last month’s Sitecore symposium I had the pleasure to present with my colleague Paula Simontacchi on deploying Sitecore through Terraform. This is the first post in a series of 2 and will discuss Terraform features which are beneficial when deploying Sitecore.

Part 2 goes into deploying a Sitecore solution in Azure based on a sample Github repo.

Terraform introduction

Terraform is an Infrastructure as Code (IaC) tool developed by Hashicorp. A Terraform solution is written in the HCL language, which is a proprietary language from Hashicorp. Below small code sample shows how to create a Resource Group and Virtual Network in Azure:

resource "azurerm_resource_group" "tfsimple" {
  name     = "tf-resources"
  location = "${var.location}"
}

resource "azurerm_virtual_network" "tfsimple" {
  name                = "tf-network"
  address_space       = ["10.0.0.0/16"]
  location            = "${azurerm_resource_group.tfsimple.location}"
  resource_group_name = "${azurerm_resource_group.tfsimple.name}"
}

There are many good resources to learn Terraform in more detail, for example the Terraform docs site or this PluralSight training. A few key concepts will be covered here. It is encouraged to have a solid understanding of Terraform before using it in production Sitecore deployments.

Multi-provider based model

Terraform uses a provider based model and has providers for almost everything you would want to deploy to. For example it supports all major cloud providers but also has providers for solutions like Cloudflare, Docker or F5. A more elaborate list can be found in Terraform’s site here

Recently Jamstack based architectures are getting more popular in Sitecore. The Terraform provider based model is a great option here as well as Terraform has providers for common resources in this stack including their Netlify and Akamai providers.

Terraform workflow

Below diagram shows the typical Terraform workflow:

  1. Init: Initializes working directory and downloads providers
  2. Plan: Creates and displays the execution plan
  3. Apply: Makes the changes to the underlying platform
  4. Destroy: Deletes the changes made in step 3

Step 1 is not necessary when you have already initialized the working directory and have downloaded all providers.

Step 4 is optional as well. However it is recommended to always destroy and reprovision infrastructure at least when changes are made to it, to ensure Terraform stays up-to-date and can continue to be used reliably to stand up infrastructure.

Plan/Dry run

The plan phase, also referred to as dry-run sometimes, is the most interesting phase. During this phase the Terraform code is compared to the underlying deployment and displays the difference i.e. the updates it will make during the apply phase. This is useful for following reasons:

  1. The result of the deployment can be validated without actually running it. This can save a lot of time and money in most Sitecore deployments as deploying all infrastructure is a time consuming process and doing this many times can result in significant cost.
  2. The result of the plan phase can be saved for execution later, for example by a different team or during a maintenance window. Running the saved plan will avoid any surprises and will provision the infrastructure exactly as per the plan
  3. In an enterprise scenario infrastructure will be provisioned from CI/CD and not from a local developers machine. Performing a dry-run is a good validation before pushing changes to source control.

Modularity

Terraform natively supports modules. Modules can be used to create reusable infrastructure. Modules can reference other modules as well. Common resources to create through modules are Subnets, Vnets, Security Groups or Vms.

A module typically creates resources based on some values passed in through variables. Outputs can be used to pass information about the created resources back to the calling code. Below is a sample module which will create a windows VM. It will use some of the variables to determine the correct settings and it will return the public IP as an output.

module "windowsservers" {
    source                        = "Azure/compute/azurerm"    
    version                       = "1.2.0"
    location                      = "${var.location}"
    remote_port                   = "3389"
    vm_size                       = "${lookup(var.vm_size, var.environment)}"
    vnet_subnet_id                = "${module.network.vnet_subnets[0]}"
  }

  output "windows_vm_public_ip"{
    value = "${module.windowsservers.public_ip_address}"
  }

Dependency Tracking

Providers in Terraform are aware of dependencies between resources. This provides some key benefits:

  • Create resources in parallel: any independent resources are created in parallel. In a Sitecore scenario this means that all the databases can be stood up at the same as the VMs
  • Visualize architectural dependencies: Terraform can generate a dependency graph which will show dependencies between all the resources in the deployment
  • IDE support: popular IDE’s have plugins for Terraform which show where each resource or variable is used, similar to “find references” in Visual Studio. This is helpful when understanding the impact of changes made to the Terraform solution.

Terraform vs. ARM

ARM is a popular solution for Sitecore deployments in Azure, however there are some benefits to using Terraform even in Azure. Below comparison lists some key differences:

TerraformARM
plan/dry-run: Validates with the deployment in place and calculates delta. This delta can be saved for later use Validation: Will validate syntax, but does not compare to underlying deployment
HCL language: supports features like interpolation, attributes, and comments JSON language: Powerful, but missing features like interpolation and does not support comments
Modules: Modules are first-class citizen Modules: Modules can be created through nested templates, but not supported natively
Usage: Terraform has a provider for almost any resource. Supports hybrid cloud or Azure in combination with other infra, e.g. Azure with Cloudflare CDNUsage: specific to Azure