This is the second part of my article about deploying Sitecore through Terraform. The first part can be found here and discusses Terraform features and explains why Terraform is a good fit for deploying Sitecore.
This article will walk through my sample Github solution which deploys a Sitecore site in Azure through Terraform. Below graph generated by Terraform’s Graph command shows the components which will be created.
Clone Github Repo
This article uses the code from the Github repo which can be found here. This repo contains a variables.tf file. The first section of this file needs to be populated with settings specific to each deployment. In this article these values will be set in a file called secret.tfvars which is excluded form Github. The variables can be set like below:
The last setting is xDbDisableFile. This patch file disabled xDB as this repo stands up a Sitecore XM topology without xDB. Folllowing is in this file, but it can also be used to patch in other settings.
After the initial setup this article will follow the standard 4-step Terraform workflow which can be seen below.
Terraform Init
After getting the repo Terraform needs to initialize the working directory and download the Azure Resource Manager provider. Running terraform init will take care of this:
Terraform Plan
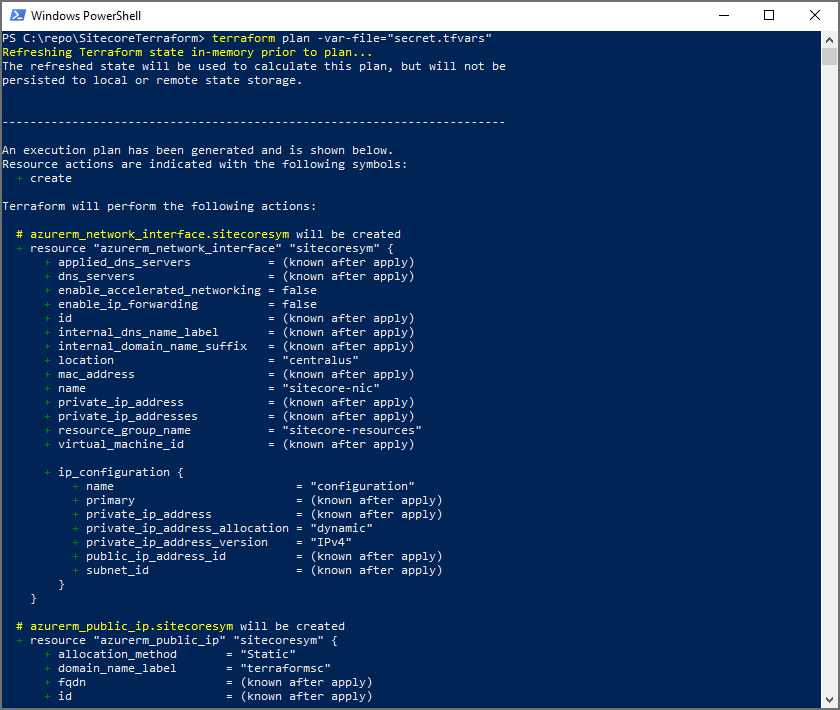
The plan command can be run now that the workspace is initialized. This will show all the resources which will be created, in this case 11 resources will be created:
Network Interface
Public IP
Resource Group
Sitecore Core Database
Sitecore Master Database
Sitecore Web Database
Firewall rule for SQL traffic
Azure SQL DB server
Subnet
Virtual Machine
Virtual Network
As mentioned before the values of some of the variables are specified in secret.tfvars, this will be passed into the plan command terraform plan -var-file=”secret.tfvars”. Below is the start of the output from this command:
Terraform Apply
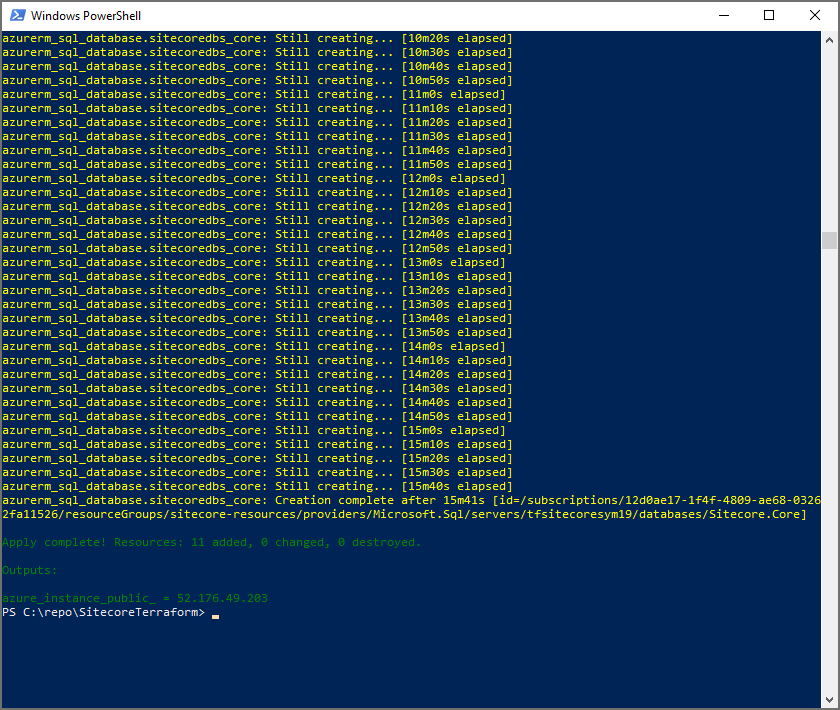
The apply command can be run now after the output from the plan command is reviewed. This will create the 11 resources from the plan command which make up the Sitecore site.
Inside the files folder in the repo is a winrm.ps1 script. This will be put on the virtual machine which is created by Terraform and will setup Sitecore. This file uses some variables which are passed in by the main.tf file here
The apply command will also need the Terraform variables files so the full apply command will look like this: terraform apply -var-file=”secret.tfvars”, this will create the resources and returns a success message after this is done:
The Sitecore site can be opened when this is done and when the winrm.ps1 powershell script is complete. By default it will be publicly accessible at <domain-name-label>.<azure-region>.cloudapp.azure.com, see below for the example with this setup:
Terraform Destroy
When done all resources can be torn down again by running terraform destroy. This is obviously an optional step, however it is important to continue to make any changes to resources through Terraform to ensure the code stays up to date and the deployment process is repeatable, predictable and automated.
In Sitecore solutions there are often requirements around the URL structure or domain on which the site will live. This is often driven by SEO and perhaps the Sitecore site even needs to share the same domain with a non-Sitecore site. This article will look at several common options and will explain when they should be used.
Below flowchart shows which option to choose depending on your needs. None of the options are mutually exclusive and they can be combined to meet multiple requirements:
Option 1: Reverse proxy/application gateway
In some cases requirements are more complex, for example your company’s Sitecore site needs to be hosted at mycompany.com but complete different servers needs to host mycompany.com/careers. This might not even be an IIS site but a site hosted on Apache or Nginx.
There are several ways to do this depending on the infrastructure which is in place. If Sitecore is hosted in the cloud here are some options which can route the traffic accordingly to prevent it from even hitting IIS
Azure Application Gateway is a load balancer which can route traffic based on attributes in the HTTP Request
AWS Application Load Balancer is an HTTP load balancer which can route traffic to a different target based on the HTTP Request
In an on-premise setup there might be similar infrastructure which can do this routing. IIS can also do this routing through the Application Request Routing (ARR) extension. In general routing this traffic away before it hits IIS is the preferred solution as it reduces the load on IIS.
Below is a sample reverse proxy rule in ARR which will route all traffic under /Careers to http://internalcareersite. This is all achieved through the routing and the site will be exposed over mycompany.com/careers:
The IgnoreUrlPrefixes setting tells Sitecore which Paths to exclude from Sitecore. This setting comes in handy if there is another site which needs to be hosted on the same domain, and the site can be hosted in the same IIS site as Sitecore. This is often an easy solution which can be helpful in many circumstances.
It can be challenging to update this setting in a clean way as there are already a number of entries of Sitecore in this setting. This article provides a good solution to only patch in your solution specific values.
URL Rewrite/Redirect
Before diving into the next few options let’s be clear on the difference between a redirect and a rewrite:
Redirect: a redirect happens when the servers responds to the client/browser and tells it to load a page or resource from a different location. The client can then retrieve the resource from the location provided by the server. For example, you can have a vanity URL at mycompany.com/mycampaign which redirects to mycompany.com/some/long/path/mycampaign
Rewrite: a rewrite is when IIS modifies an incoming request before it hands it off to its handlers (inbound rewrite) or modifies an outgoing response before it sends it to the client (outbound rewrite). In this case there are no additional request/responses like there are in case of a redirect. An example of this could be to rewrite all the incoming request starting with mycompany.com/english to mycompany.com/en-us. In this case the URL in the browser would be mycompany.com/english, but on Sitecore it would appear as if it came at mycompany.com/en-us as IIS modified it before handing off to Sitecore. These techniques can be powerful in a variety of situations, for example to have different URL structure then what Sitecore OOTB supports with language and sites.
There are a variety of Sitecore modules which can help with redirects which are managed in Sitecore, SXA also has a redirect module. Also IIS has a redirect/rewrite extension which is already a prerequisite for Sitecore installations.
3. Rewrite through IIS rewrite module
Sometimes it can be challenging to meet certain URL requirements with Sitecore without making any customizations, for example there might be a need to have the language in the URL as /english or /spanish etc. Implementing this in Sitecore can be complex as it requires customizations to processor(s) in the httpRequestBegin pipeline as well as the logic to generate links correctly. Below inbound and outbound rewrite rule will have the URL as /english but to Sitecore it appears as /en-us.
An important consideration when doing this is that in Sitecore the links will still show as /en-us, for example in the analytics.
Inbound rule: to make sure /english and anything after it gets send to /en-us on the same path, e.g. /english/products will go to /en-us/products:
Outbound rule: to make sure any link in an anchor text gets “en-us” replaced with “english”. Depending on your setup more rules might be required to update the links in other places:
<rewrite>
	<outboundRules>
		<rule name="Update en-us to english in anchor">
			<match filterByTags="A" pattern="^/en-us/(.*)" />
			<action type="Rewrite" value="/english/{R:1}" />
		</rule>
	</outboundRules>
</rewrite>
Option 4: Redirect through IIS Rewrite module
Some redirects rarely change and therefore are not managed by content authors, for example a redirect from http to https, to lowercase URLs or to enforce a trailing slash. In such cases it makes sense to have the redirects in IIS as it is acceptable to update these only with a deployment. Another advantage of doing this through IIS is that the request never hits Sitecore, it gets redirected straight from IIS which is more efficient. Below is a sample IIS redirect which redirect from http to https:
Sometimes there is a need to do something similar to a rewrite (option 3), but it cannot be done with the rewrite module because it requires information from the Sitecore context. In this case perhaps the OOTB item resolution logic does not resolve the desired item or a different context language or site needs to be set. Before getting into more detail here are some common use cases:
Sitecore’s language or site resolution logic does not meet the requirements. For example the language does not need to come from the URL but from the Sitecore IP Geolocation service.
A Single Page Application (SPA) is used which uses push-state. In this case it is common to want to deep link into these push state route. For example the SPA could live in mycompany.com/myspa, with myspa being the Sitecore item. There could be a route like /myspa/filter/category1. Sitecore would try to resolve an item under that path but it is not there so it would return a 404. In this case the Sitecore ItemResolver can be customized to still resolve the correct item. An more detailed approach for this can be found here
In these cases the correct Sitecore processor needs to be updated. Below are the 3 most common processors which need to be updated. They are all part of the HttpRequestBegin pipeline:
Sitecore.Pipelines.HttpRequest.SiteResolver: as the name suggests this processor resolves the site from the context. This processor serves as a good starting point to adjust the resolution of the context site.
Sitecore.Pipelines.HttpRequest.LanguageResolver: the language resolver determines the correct language based on the context. The default Sitecore language resolution can put some constraints on the URL structure as the language needs to match a culture. Often business wants user friendly language in the URL like English, Spanish, French etc. In these cases customizing the language resolver can be a good option.
Sitecore.Pipelines.HttpRequest.ItemResolver: this resolves the context item in Sitecore and might be the most customized processor in Sitecore to solve a variety of different issues. There are even some popular modules that customize this like the wildcard module
Updating Sitecore processors can be tricky as they can also run outside the scope of your solution, for example when a user logs into Sitecore CMS (/sitecore/login). If possible it is a good idea to keep the existing logic as is, but run additional code in case the existing resolution fails because the custom solution requirements are different.
Updating these processors will ensure Sitecore handles incoming requests correctly, however the links Sitecore generates to other pages will not take this logic into account. To ensure these links work correctly there are 2 options:
Put in a redirect to send the links to the correct location
Override Sitecore’s logic to generate links by putting in a custom link provider or a custom renderfield pipeline
Option 6: Sitecore Redirect Module
In many cases the content authors need to manage redirects along with other content updates they make in Sitecore. In these cases it is recommended to manage the redirects in Sitecore content as well. There are a variety of Sitecore modules which can help with redirects and SXA also has a redirect module.
Getting your health check right is important when designing a highly available and elastic Sitecore solution. For years Sitecore comes with an builtin health check page at /sitecore/service/heartbeat.aspx which checks the status of the the SQL databases. This can be used for a load balancer or docker health check. A few quick notes on the heartbeat.aspx:
In some versions of Sitecore the heartbeat.aspx will throw an error, and you will have to exclude some connection strings from it as described in a different article on this blog
Starting in Sitecore 9.3 a new health check mechanism is used based on the Microsoft.Extensions.Diagnostics.HealthChecks namespace. Here is a great article describing how to customize this. The same code from below can be used in the updated health check mechanism.
There are several different approaches when setting up a health check in Sitecore. In most cases I recommend keeping the health check small to prevent it from going unhealthy during heavy load, this technique can be combined with the Application Initialization feature in IIS to warmup the solution after the site starts.
The code for the heartbeat.aspx lives in Sitecore.Web.Services.HeartbeatCode in the Sitecore.Client assembly. The important methods are virtual so they can be overriden to implement additional checks to ensure all critical components of the solutions are healthy.
There are many Sitecore solutions where the private session state is stored in Redis and its availability is critical. In such scenarios it will make sense to ping Redis from the health check to ensure the server can access it. Below code sample shows how to check the Redis database which is setup for private session state:
public class CustomHeartbeat : Sitecore.Web.Services.HeartbeatCode
{
    protected BeatResults CheckRedis(BeatResults beatresult)
    {
        //get connection details for private Redis session database
        //same pattern can be used to check shared session database
        var sessionSection = (SessionStateSection)WebConfigurationManager.GetSection("system.web/sessionState");
        var connString = sessionSection.Providers["Redis"].Parameters.Get("connectionString");
        string redisConnection = ConfigurationManager.ConnectionStrings[connString].ConnectionString;

        using (ConnectionMultiplexer connection = ConnectionMultiplexer.Connect(redisConnection))
        {
            var subscriber = connection.GetSubscriber();
            var timespan = subscriber.Ping();

            Log.Info($"Successfully pinged Redis from healthcheck in: {timespan}", this);
        }

        return beatresult;
    }

    protected override BeatResults DoBeat()
    {
        //this checks the SQL databases
        var beatResults = base.DoBeat();

        beatResults = CheckRedis(beatResults);

        return beatResults;
    }
}
There are already a few good blog posts which describe how to use CloudFront in combination with Sitecore. All the posts I saw used CloudFront as a solution to offload images and other static resources on a different domain, and then change Sitecore to load static resources from this different domain. Sitecore itself will not be using CloudFront. This post will describe a different approach where Sitecore sits behind CloudFront as well. It will also discuss the advantages of using this approach.
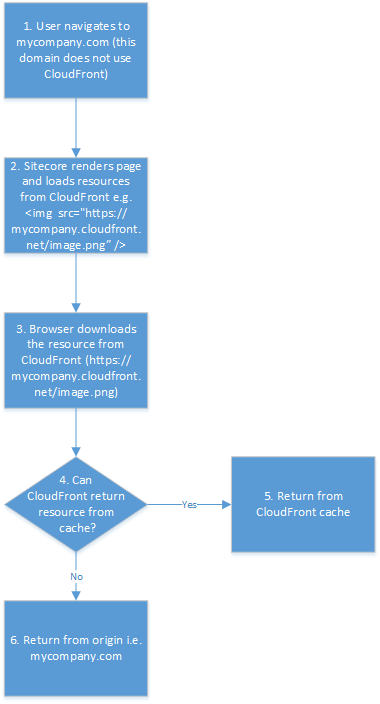
Before diving into using CloudFront for Sitecore lets quickly look at the approach of just offloading static resources to CloudFront on a separate domain. Following flowchart shows this in more detail:
This is an good solutions and it solves the issue of making the site faster by delivering large resources quicker from edge locations globally, at scale and in a more cost effective manner.
Advantages of using CloudFront with Sitecore
In the previous setup Sitecore pages are not using CloudFront, and therefore cannot take advantage of some useful CloudFront features like:
Security at the Edge: CloudFront provides protection against most common DDoS attacks. It can also be used to block traffic from certain countries or only allow traffic from a specific set of countries
SSL Offloading/compression: SSL can be terminated at CloudFront and CloudFront could gzip compress the responses. Even when not offloading SSL, SSL will be more efficient with CloudFront as it will reuse connections between itself and the origin
Restricting access to premium content: if you have premium content which users need to pay for then you can use signed URLs or signed cookies to limit access. This is much easier to standup then a fully fledged IDP but still provides enterprise grade security.
Error Pages: Sitecore can handle most common errors better than CloudFront can. However some catastrophic errors are better handled outside of Sitecore, for example a scenario where the app pool is crashing or hanging or a scenario where Sitecore is unable to handle the incoming load. CloudFront supports customized error pages depending on what gets returned from the origin. More info can be found here.
Host Sitecore behind CloudFront overview
This article will will describe a different solution where everything is fronted by CloudFront, and there is only one URL. This way all CloudFront features can be leveraged for both the Sitecore pages as well as all other resources. The origin in this case will be the Sitecore ELB. Below diagram explains this in more detail:
Now that Sitecore pages are also fronted by CloudFront they could be setup to be cacheable, see number 3. Recommendation is to never do this when using Sitecore as all analytics and personalization will not apply and register the page view when CloudFront returns it form cache.
Setting up Sitecore behind CloudFront
This section walks through some of the important configuration when setting up Sitecore’s ELB as the origin of the load balancer.
Set Sitecore ELB as origin
When creating the CloudFront distribution the ELB which hosts Sitecore needs to be set as the origin, see below screenshot:
Allowed HTTP Methods
Since all traffic goes through CloudFront it is important to allow all HTTP verbs which your site uses, e.g. POST, PUT, DELETE etc. See below screenshot for this option in the UI.
Configure caching
There are 2 ways to control how long content stays in the CloudFront cache, more details can be found here
Using headers to control cache duration for individual objects: CloudFront will honor the Cache-Control and Expires response headers to control how long objects stay in the cache. This is recommended by CloudFront and personally I also prefer this approach as everything can be controlled from the Sitecore site in IIS.
Specifying the amount of time that CloudFront caches objects: In this case the values for time to live are specified in CloudFront. To use this select “Use legacy cache settings” and then “Customize” under object caching, see screenshot below
Understanding other CloudFront settings
There are many other settings in CloudFront and using them correctly can be critical for your site to work properly and to gain maximum benefit from CloudFront. This page provides more detail about all the different settings and how they work.
I noticed that my previous post about Redis is one of the most popular on my blog. Since I’ve been using Redis for a while I decided to write another post with some of the lessons learned.
Sitecore connectivity to Redis
The first step in getting Redis to work with Sitecore is to ensure there is connectivity between them. When Sitecore starts up it will ping Redis. The Sitecore log will contain something like below when connectivity to Redis is established successfully. Notice the Redis response to the Ping and the message that the endpoint returned with success.
11056 11:06:22 INFO  Sending critical tracer: Interactive/jeroen.redis.cache.windows.net:6380
11056 11:06:22 INFO  Writing to Interactive/jeroen.redis.cache.windows.net:6380: ECHO
11056 11:06:22 INFO  Flushing outbound buffer
11056 11:06:22 INFO  Starting read
11056 11:06:22 INFO  Connect complete: jeroen.redis.cache.windows.net:6380
11056 11:06:22 INFO  Response from Interactive/jeroen.redis.cache.windows.net:6380 / ECHO: BulkString: 16 bytes
WIN-RCJOA5J2MOL:Write 11:06:22 INFO  Writing to Interactive/jeroen.redis.cache.windows.net:6380: GET __Booksleeve_TieBreak
WIN-RCJOA5J2MOL:Write 11:06:22 INFO  Writing to Interactive/jeroen.redis.cache.windows.net:6380: PING
8912 11:06:22 INFO  Response from Interactive/jeroen.redis.cache.windows.net:6380 / GET __Booksleeve_TieBreak: (null)
8912 11:06:22 INFO  Response from Interactive/jeroen.redis.cache.windows.net:6380 / PING: SimpleString: PONG
1068 11:06:22 INFO  All tasks completed cleanly, IOCP: (Busy=0,Free=800,Min=800,Max=800), WORKER: (Busy=43,Free=757,Min=789,Max=800)
1068 11:06:22 INFO  jeroen.redis.cache.windows.net:6380 returned with success
There can be a variety of issues which prevents Sitecore from connecting to Redis:
Wrong Redis engine version: Sitecore does not work with Redis engine version 4 or 5. This is easy to get wrong especially if using AWS ElastiCache which currently defaults to version 5.0.3. When using AWS ElastiCache make sure to select version 3.2.6. This issue is not obvious from the log. When using the wrong version the log might show something like this:
INFO name.cache.amazonaws.com: 6380 failed to nominate (Faulted)
INFO > UnableToResolvePhysicalConnection on GET 33488
AccessKey missing in connection string: The access key might need to be put inside connectionString value. I have blogged about this issue before see here
Intermittent timeout issues: There might be intermittent timeout issues when Sitecore is connected to Redis. This KB article provides a good start to resolve these kind of issues. If this happens the log will show something like this:
Exception: System.TimeoutException
Message: Timeout performing EVAL, inst: 1, mgr: Inactive, err: never, queue: 24, qu: 0, qs: 24, qc: 0, wr: 0, wq: 0, in: 12544, ar: 0, IOCP: (Busy=5,Free=395,Min=200,Max=400), WORKER: (Busy=4,Free=396,Min=88,Max=400), clientName: client
Source: StackExchange.Redis.StrongName
   at StackExchange.Redis.ConnectionMultiplexer.ExecuteSyncImpl[T](Message message, ResultProcessor`1 processor, ServerEndPoint server)
   at StackExchange.Redis.RedisBase.ExecuteSync[T](Message message, ResultProcessor`1 processor, ServerEndPoint server)
   at StackExchange.Redis.RedisDatabase.ScriptEvaluate(String script, RedisKey[] keys, RedisValue[] values, CommandFlags flags)
   at Sitecore.SessionProvider.Redis.StackExchangeClientConnection.<>c__DisplayClass12_0.<Eval>b__0()
   at Sitecore.SessionProvider.Redis.StackExchangeClientConnection.RetryForScriptNotFound(Func`1 redisOperation)
   at Sitecore.SessionProvider.Redis.StackExchangeClientConnection.RetryLogic(Func`1 redisOperation)
   at Sitecore.SessionProvider.Redis.StackExchangeClientConnection.Eval(String script, String[] keyArgs, Object[] valueArgs)
   at Sitecore.SessionProvider.Redis.RedisConnectionWrapper.TryTakeWriteLockAndGetData(String sessionId, DateTime lockTime, Object& lockId, ISessionStateItemCollection& data, Int32& sessionTimeout)
   at Sitecore.SessionProvider.Redis.RedisSessionStateProvider.GetItemFromSessionStore(Boolean isWriteLockRequired, HttpContext context, String id, Boolean& locked, TimeSpan& lockAge, Object& lockId, SessionStateActions& actions)
  at Sitecore.SessionProvider.Redis.RedisSessionStateProvider.GetItemExclusive(HttpContext context, String id, Boolean& locked, TimeSpan& lockAge, Object& lockId, SessionStateActions& actions)
   at System.Web.SessionState.SessionStateModule.GetSessionStateItem()
   at System.Web.SessionState.SessionStateModule.BeginAcquireState(Object source, EventArgs e, AsyncCallback cb, Object extraData)
   at System.Web.HttpApplication.AsyncEventExecutionStep.System.Web.HttpApplication.IExecutionStep.Execute()
   at System.Web.HttpApplication.ExecuteStep(IExecutionStep step, Boolean& completedSynchronously)
Designing for performance
There are many factors which impact the performance of Redis. The only way to determine the best configuration for a certain site is to perform a load test with a load that is similar to production traffic. Based on my experience I recommend exploring below options:
Enable Clustering: It is often more effective to create a Redis cluster with multiple instances than to increase the size of a single non clustered Redis instance. Each Redis instance can only be scaled vertically by allocating more resources to it. With a cluster Redis will create multiple instances and divide the data over the instances based on its key. This technique is also referred to as sharding and is supported by Redis, which makes it transparent to Sitecore. Therefore there are no changes needed on Sitecore’s side, it just needs to have its Redis connection string pointed to the endpoint of the cluster.
Important note: Sitecore is using StackExchange.Redis.StrongName to access Redis. “Move” exceptions can occur below version 1.1.603 of this library when clustering is enabled. A little more information about this issue can be found here. This link only describes the issue in Azure but the same issue can occur anywhere else as well. Per below table all Sitecore 9.0 versions use a version of the Stackexchange Redis driver below 1.1.603 and might throw “Move” exceptions when configured to use a Redis cluster.
Sitecore
StackExchange Redis
9.0 Initial Release (171002)
1.0.488
9.0 Update-1 (171219)
1.0.488
9.0 Update-2 (180604)
1.0.488
9.1 Initial Release (001564)
1.2.6
9.1 Update-1 (002459)
1.2.6
Keep compression disabled: the Redis server is single-threaded. This makes it perform well with small key-value pairs, but performance will decrease when the size of the data it stores goes up. The advantage of disabling compression is that Sitecore does not need to spend CPU time compressing and decompressing the data. However the amount of data that needs to be send to Redis goes up, we have seen the amount of data send to Redis triple without compression. This had a significant adverse impact on Redis’ performance and the performance of the entire site. The extra CPU time with compression enabled was negligible compared to overall CPU. Below image taken from Redis.io shows how throughput decreases with increased data size.
The default implementation of the ASP .NET Session State Module uses exclusive locking for each request from the same session. This means ASP .NET will only execute one request at a time from the same browser. Any other request will be locked by the Session State Module and will not be executed until the previous request is complete and it can obtain the exclusive lock. This can cause performance issues in many real-world scenarios.
Below screenshot from IIS shows 6 concurrent request to the homepage from the same browser. Sitecore is only executing the bottom request, which is in the ExecuteRequestHandler state. All other 5 requests are in the RequestAcquireState state and will only be fulfilled one at a time after the bottom request is complete. Each of the requests in RequestAcquireState state will check the session store every 0.5 seconds to see if it can obtain a lock.
This can cause pressure on the session state store in case many requests take some time to execute. Depending on the session store it is common to see messages like below in log:
Common errors with session state in Redis:
Exception type: TimeoutException
Exception message: Timeout performing EVAL, inst: ....
at StackExchange.Redis.ConnectionMultiplexer.ExecuteSyncImpl[T](Message message, ResultProcessor1 processor, ServerEndPoint server) at StackExchange.Redis.RedisBase.ExecuteSync[T](Message message, ResultProcessor1 processor, ServerEndPoint server)
at StackExchange.Redis.RedisDatabase.ScriptEvaluate(String script, RedisKey[] keys, RedisValue[] values, CommandFlags flags)
at Sitecore.SessionProvider.Redis.StackExchangeClientConnection.<>c__DisplayClass7.b__6()
at Sitecore.SessionProvider.Redis.StackExchangeClientConnection.RetryForScriptNotFound(Func1 redisOperation) at Sitecore.SessionProvider.Redis.StackExchangeClientConnection.RetryLogic(Func1 redisOperation)
at Sitecore.SessionProvider.Redis.StackExchangeClientConnection.Eval(String script, String[] keyArgs, Object[] valueArgs)
at Sitecore.SessionProvider.Redis.RedisConnectionWrapper.TryTakeWriteLockAndGetData(String sessionId, DateTime lockTime, Object& lockId, ISessionStateItemCollection& data, Int32& sessionTimeout)
at Sitecore.SessionProvider.Redis.RedisSessionStateProvider.GetItemFromSessionStore(Boolean isWriteLockRequired, HttpContext context, String id, Boolean& locked, TimeSpan& lockAge, Object& lockId, SessionStateActions& actions)
at Sitecore.SessionProvider.Redis.RedisSessionStateProvider.GetItemExclusive(HttpContext context, String id, Boolean& locked, TimeSpan& lockAge, Object& lockId, SessionStateActions& actions)
at System.Web.SessionState.SessionStateModule.GetSessionStateItem()
Common errors with session state in SQL:
Message: Timeout expired. The timeout period elapsed prior to obtaining a connection from the pool. This may have occurred because all pooled connections were in use and max pool size was reached.
Source: System.Data
   at System.Data.ProviderBase.DbConnectionFactory.TryGetConnection(DbConnection owningConnection, TaskCompletionSource`1 retry, DbConnectionOptions userOptions, DbConnectionInternal oldConnection, DbConnectionInternal& connection)
   ...
   at System.Web.SessionState.SqlSessionStateStore.SqlStateConnection..ctor(SqlPartitionInfo sqlPartitionInfo, TimeSpan retryInterval)
Common errors with session state in Mongo:
ERROR Application error.
Exception: System.TimeoutException
Message: Timeout waiting for a MongoConnection.
Source: MongoDB.Driver
   at MongoDB.Driver.Internal.MongoConnectionPool.AcquireConnection(AcquireConnectionOptions options)
   ...
   at Sitecore.SessionProvider.MongoDB.MongoSessionStateProvider.GetItemExclusive(HttpContext context, String id, Boolean& locked, TimeSpan& lockAge, Object& lockId, SessionStateActions& actions)
   at System.Web.SessionState.SessionStateModule.GetSessionStateItem()
   at System.Web.SessionState.SessionStateModule.BeginAcquireState(Object source, EventArgs e, AsyncCallback cb, Object extraData)
   at System.Web.HttpApplication.AsyncEventExecutionStep.System.Web.HttpApplication.IExecutionStep.Execute()
   at System.Web.HttpApplication.ExecuteStep(IExecutionStep step, Boolean& completedSynchronously)
Too many locked requests from a single session
ERROR Application error.
Exception: System.Web.HttpException
Message: The request queue limit of the session is exceeded.
Source: System.Web
   at System.Web.SessionState.SessionStateModule.QueueRef()
   at System.Web.SessionState.SessionStateModule.PollLockedSession()
   at System.Web.SessionState.SessionStateModule.GetSessionStateItem()
   at System.Web.SessionState.SessionStateModule.BeginAcquireState(Object source, EventArgs e, AsyncCallback cb, Object extraData)
   at System.Web.HttpApplication.AsyncEventExecutionStep.System.Web.HttpApplication.IExecutionStep.Execute()
   at System.Web.HttpApplication.ExecuteStepImpl(IExecutionStep step)
   at System.Web.HttpApplication.ExecuteStep(IExecutionStep step, Boolean& completedSynchronously)
Sitecore has a good KB article which describes this in more detail which can be found here. This article mentions to set session state to readonly and describes how to do this for 2 scenarios:
Custom MVC Routes: Set the session state to readonly on the controller. This can be done by decorating the controller with this attribute: [SessionState(SessionStateBehavior.ReadOnly)]
ASP.NET Web Forms pages: Set the EnableSessionState=”Readonly” on the pages directive
This article does not mention how to fix this for Sitecore MVC pages. The solution provided below describes how to address this for Sitecore MVC pages.
Solution
Sitecore sets this to the Default Session state behavior in the SitecoreControllerFactory for Sitecore MVC pages. This is a virtual method so this can be overridden to change the session state behavior:
using Sitecore.Diagnostics;
using Sitecore.Mvc.Controllers;
using Sitecore.Mvc.Extensions;
using System;
using System.Collections.Generic;
using System.Linq;
using System.Web;
using System.Web.Mvc;
using System.Web.Routing;
using System.Web.SessionState;

namespace Foundation.Extensions.Factory
{
    public class ReadOnlySessionStateSitecoreControllerFactory : SitecoreControllerFactory
    {
        public ReadOnlySessionStateSitecoreControllerFactory(IControllerFactory innerFactory) : base(innerFactory)
        {
        }

        public override SessionStateBehavior GetControllerSessionBehavior(RequestContext requestContext, string controllerName)
        {
            Assert.ArgumentNotNull(requestContext, "requestContext");
            Assert.ArgumentNotNull(controllerName, "controllerName");

            if (controllerName.EqualsText(SitecoreControllerName))
            {
                return SessionStateBehavior.ReadOnly;
            }

            return InnerFactory.GetControllerSessionBehavior(requestContext, controllerName);
        }
    }
}
An initialize pipeline processor needs to be created to set our new controller factory:
using Foundation.SitecoreExtensions.Factory;
using Sitecore.Mvc.Controllers;
using Sitecore.Mvc.Pipelines.Loader;
using Sitecore.Pipelines;
using System;
using System.Collections.Generic;
using System.Linq;
using System.Web;

namespace Foundation.Extensions.Processors.Initialize
{
    public class InitializeReadOnlySessionStateSitecoreControllerFactory : InitializeControllerFactory
    {
        protected Func<System.Web.Mvc.ControllerBuilder> ControllerBuilder = () => System.Web.Mvc.ControllerBuilder.Current;

        protected override void SetControllerFactory(PipelineArgs args)
        {
            System.Web.Mvc.ControllerBuilder controllerBuilder = ControllerBuilder();
            var controllerFactory = new ReadOnlySessionStateSitecoreControllerFactory(controllerBuilder.GetControllerFactory());
            controllerBuilder.SetControllerFactory(controllerFactory);
        }
    }
}
Below XML file can be used to patch in this new pipeline processor
Below screenshot shows the same scenario as in the beginning of this post, but now all 8 requests are getting executed at the same time.
Setting the session state to readonly for Sitecore MVC pages can cause significant performance improvements and will help reduce the load on the session store as described in Sitecore’s KB article. Before doing this it is important to understand below considerations:
Multiple requests from the same browser will execute at the same time. Your application should be able to handle this without causing any unintended issues by multiple threads modifying shared objects at the same time.
Custom objects cannot be stored in the session state anymore when it is set to ReadOnly, except when the session state is in process. Using a custom cache as already suggested in Sitecore’s article is a good solution.
This issue might not occur when a site is running smoothly, but can turn a small issue into an overall site stability issue. The session store can get under a lot of load for example if some pages in your site start being slow or in case of an app pool recycle. This can impact the overall stability of the site as it can overload SQL, Redis or Mongo.
During last month’s Sitecore symposium I had the pleasure to present with my colleague Paula Simontacchi on deploying Sitecore through Terraform. This is the first post in a series of 2 and will discuss Terraform features which are beneficial when deploying Sitecore.
Part 2 goes into deploying a Sitecore solution in Azure based on a sample Github repo.
Terraform introduction
Terraform is an Infrastructure as Code (IaC) tool developed by Hashicorp. A Terraform solution is written in the HCL language, which is a proprietary language from Hashicorp. Below small code sample shows how to create a Resource Group and Virtual Network in Azure:
There are many good resources to learn Terraform in more detail, for example the Terraform docs site or this PluralSight training. A few key concepts will be covered here. It is encouraged to have a solid understanding of Terraform before using it in production Sitecore deployments.
Multi-provider based model
Terraform uses a provider based model and has providers for almost everything you would want to deploy to. For example it supports all major cloud providers but also has providers for solutions like Cloudflare, Docker or F5. A more elaborate list can be found in Terraform’s site here
Recently Jamstack based architectures are getting more popular in Sitecore. The Terraform provider based model is a great option here as well as Terraform has providers for common resources in this stack including their Netlify and Akamai providers.
Terraform workflow
Below diagram shows the typical Terraform workflow:
Init: Initializes working directory and downloads providers
Plan: Creates and displays the execution plan
Apply: Makes the changes to the underlying platform
Destroy: Deletes the changes made in step 3
Step 1 is not necessary when you have already initialized the working directory and have downloaded all providers.
Step 4 is optional as well. However it is recommended to always destroy and reprovision infrastructure at least when changes are made to it, to ensure Terraform stays up-to-date and can continue to be used reliably to stand up infrastructure.
Plan/Dry run
The plan phase, also referred to as dry-run sometimes, is the most interesting phase. During this phase the Terraform code is compared to the underlying deployment and displays the difference i.e. the updates it will make during the apply phase. This is useful for following reasons:
The result of the deployment can be validated without actually running it. This can save a lot of time and money in most Sitecore deployments as deploying all infrastructure is a time consuming process and doing this many times can result in significant cost.
The result of the plan phase can be saved for execution later, for example by a different team or during a maintenance window. Running the saved plan will avoid any surprises and will provision the infrastructure exactly as per the plan
In an enterprise scenario infrastructure will be provisioned from CI/CD and not from a local developers machine. Performing a dry-run is a good validation before pushing changes to source control.
Modularity
Terraform natively supports modules. Modules can be used to create reusable infrastructure. Modules can reference other modules as well. Common resources to create through modules are Subnets, Vnets, Security Groups or Vms.
A module typically creates resources based on some values passed in through variables. Outputs can be used to pass information about the created resources back to the calling code. Below is a sample module which will create a windows VM. It will use some of the variables to determine the correct settings and it will return the public IP as an output.
Providers in Terraform are aware of dependencies between resources. This provides some key benefits:
Create resources in parallel: any independent resources are created in parallel. In a Sitecore scenario this means that all the databases can be stood up at the same as the VMs
Visualize architectural dependencies: Terraform can generate a dependency graph which will show dependencies between all the resources in the deployment
IDE support: popular IDE’s have plugins for Terraform which show where each resource or variable is used, similar to “find references” in Visual Studio. This is helpful when understanding the impact of changes made to the Terraform solution.
Terraform vs. ARM
ARM is a popular solution for Sitecore deployments in Azure, however there are some benefits to using Terraform even in Azure. Below comparison lists some key differences:
Terraform
ARM
plan/dry-run: Validates with the deployment in place and calculates delta. This delta can be saved for later use
Validation: Will validate syntax, but does not compare to underlying deployment
HCL language: supports features like interpolation, attributes, and comments
JSON language: Powerful, but missing features like interpolation and does not support comments
Modules: Modules are first-class citizen
Modules: Modules can be created through nested templates, but not supported natively
Usage: Terraform has a provider for almost any resource. Supports hybrid cloud or Azure in combination with other infra, e.g. Azure with Cloudflare CDN
HTML caching is arguably the best way to improve Sitecore performance. Sometimes you can run into issues when you enable HTML cache on a rendering and the rendering has been added to the same page multiple times. This will only happen if the renderings do not have a datasource or share the same datasource, but will still render different content. This could happen for example when the renderings have different rendering parameters or have some custom logic which changes the content.
This can be fixed in a generic way by overriding the GenerateKey method of the GenerateCacheKey RenderRendering Processor. Below code will add the UniqueId of each rendering to the cachekey which will ensure the cached output is unique for each rendering.
using Sitecore.Mvc.Pipelines.Response.RenderRendering;
using Sitecore.Mvc.Presentation;

namespace Foundation.Pipelines.RenderRendering
{
    public class GenerateCustomCacheKey : GenerateCacheKey
    {
        protected override string GenerateKey(Rendering rendering, RenderRenderingArgs args)
        {
            var cacheKey = base.GenerateKey(rendering, args);

            cacheKey += rendering.UniqueId;

            return cacheKey;
        }
    }
}
During last month’s Sitecore symposium I had the pleasure to present with my colleague Ben Adamski on expanding the reach of your Sitecore content with voice-activated assistants through an Alexa skill. This blog post will describe the integration discussed during this presentation and will provide some additional details.
Sitecore 9 omnichannel foundation
Sitecore has a solid omnichannel foundation which enables it to act as a headless CMS. Below diagram shows the main integration points exposed by Sitecore out of the box.
OData Item Service: this service can be used to query and retrieve any Sitecore item and retrieve it in JSON format.
SXA Layout Service: the SXA layout service supports modelling content as JSON. This is done in the experience editor and uses the same layout engine as regular Sitecore pages. This allows content authors to use the tools they are already familiar with and personalization is supported. Also analytics and tracking are working like a regular Sitecore page as the layout engine is used to render.
xConnect Client API: the xConnect client API needs to be used to retrieve the previous customers’ interactions with Sitecore.
Commerce 9 OData API: any data which resides in Sitecore Commerce can be retrieved using this API.
Integration with the Sitecore services
There are several options to call the Sitecore services mentioned above. They were called from AWS Lambda in our demo during Symposium but there are some other options too:
AWS Lambda: this is AWS’ serverless computing platform. Here are some key considerations for hosting this in Lambda: Pro:
– Relatively simple integration with Alexa. Alexa runs in AWS and integration with Lambda takes just a few clicks and there are many examples online.
– Little effort required to include Alexa SDK which simplifies integration with Alexa Con:
– Most Sitecore developers are not familiar with Lambda and will need to spend some time getting up to speed
Azure/on-premise: Alexa can call any restful endpoint so the integration layer can be hosted anywhere accessible by AWS so this can be hosted in Azure or your existing on-premise data center: Pro:
– No need to get up to speed with a new platform Con:
– Will require more effort to integrate securely with Alexa
Alexa Skill Kit SDK
There is an Alexa Skill Kit SDK available which makes working with Alexa significantly easier. The SDK is available in Node.js, Java and Python. Getting started with the Node.js SDK is surprisingly simple for C# developers as the new version 2 of the SDK is using async/await and promises instead of the callback based style which was previously used. Below is a code sample which runs when the user performs a search in the Alexa Skill. There are a few things to note about this:
This uses the Item Service to perform the search. The query is built on line 9.
The call to execute and await the search query is on line 11 and the httpGet method is starting at line 31. This calls the Item Service.
Methods from the Alexa Skill Kit SDK are used extensively for example on lines 23-28 to send the output speech to Alexa.
The focus on this blog post is on the Sitecore integration with Alexa but it is important to understand that there is some Alexa work as well, specifically setting up the interaction model. There are 3 main entities in the interaction model:
Intents: the intent defines what the user is trying to achieve. The code above is handling the search intent.
Utterances: these are phrases likely spoken by the user to invoke the intent. Most intents will have multiple utterances. In above example an utterance mapped to the search intent could be “please search for “
Custom slot types: slot types hold the values for phrases the user says, but cannot be part in the utterance. In above example the “search term” is an example of a slot type and Alexa will automatically populate it with the search team spoken by the user.
The interaction model is stored in json, below is the json from the search intent. More information about the interaction model can be found here.
{
  "name": "SearchIntent",
  "slots": [
    {
      "name": "SearchTerm",
      "type": "AMAZON.SearchQuery"
    }
  ],
  "samples": [
    "please search for {SearchTerm}",
    "search for {SearchTerm}",
    "what is {SearchTerm}"
  ]
}
Integrated Alexa with other channels
It is important to built an Alexa Skill which is integrated with your brand’s other channels. A user is not going to have a good voice experience with a disconnected Alexa skill as this skill is not able to leverage customer interaction information from other channels to deliver a relevant and personalized experience. It is also important to understand customers behavior across all channels to get a single view of the customer and to provide relevant content to each user.
With the customer’s permission Alexa can return the location of the customer. This can be used to provide more relevant location based content to the user. During our presentation we showed location based personalization with Sitecore and Alexa. The location cannot be used integrate between channels as Amazon does not allow use of the location to associate the user to a customer with the same address. Amazon can reject or suspend your skill if they find out this is being done. More information about the use of location can be found here
Account linking is the feature which should be used to connect Alexa with other channels. Account linking connects the identity of the Alexa user to an identity in a third party system through OAuth 2.0. Setting this up will be easier if the Sitecore solution runs on version 9 since this supports federated authentication. More information about account linking can be found here.
The heartbeat page is a useful page in Sitecore as it shows if Sitecore can connect to it’s databases. If so it will return a 200 status. It can be found at /sitecore/service/heartbeat.aspx and it can be a good practice to point the load balancer’s health check to this page. This will avoid that any traffic is send to a server which cannot connect to its backend database.
Sitecore 9 has introduced a number of new connectionstrings with xConnect and the heartbeat page will fail on these. This can be avoided by adding the new connectionstrings to the excluded connections so the heartbeat page will not return an error while Sitecore’s databases are online. Below is the value which can be used to get the heartbeat page to work in Sitecore 9.